Jeoss Full Bandwidth WIFI Extender
The idea is to set up a Jeoss box able to "roam" among several APs, to dynamically connect to the one with the strongest signal while at the same time providing routed AP services downstream. It is required the Station and AP functions to be performed independently from each other in order to keep full WIFI bandwidth.
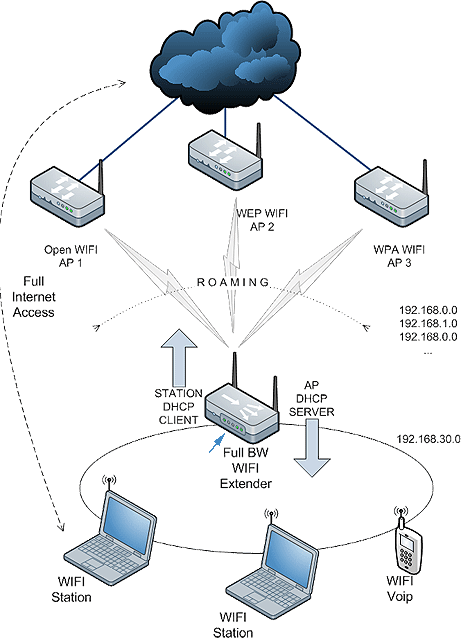
Our controlled zone only includes our Jeoss box, even when we have to know the upstream AP's association credentials we cannot perform any configuration change on them.
The full bandwidth requirement forces us to use two radios; the one upstream always performing as a Station
and the one downstream always performing as AP.
The Station interface has to be able to get its IP, Default Gateway, and DNS servers as DHCP client of the associated upstream AP. Of course these addresses will not always be the same nor correspond to the same network either.
Downstream the scenario is the opposite; it is our AP interface the one that has to provide DHCP server services assigning IPs to its clients.
Finally Between both interfaces we need routing services that have to self-adapt to situations where the upstream AP can dynamically change re-assigning a new IP every time.
Jeoss Station side
On the Jeoss Station side we have to:
- Transform our ath0 radio into a Station
- Implement roaming capabilities among several APs
- Set a dynamic route between Jeoss Station (ath0) and AP (ath1) sides
We start using the wpa_supplicant package in roaming mode. This package name is a bit misleading suggesting it only works handling the station side of a WPA wireless encryption connection. But in fact it can handle dynamic connections to a variety of encrypted and open networks.
let's (partially) edit /etc/network/interfaces considering ath0 is our Station side radio
# The ath0 Station Upstream connection************************************
# "manual" is required
iface ath0 inet manual

# ensure ath0 is down (never fails because of || "true")
pre-up wlanconfig ath0 destroy || true

# set up the ath0 device in sta mode before bringing up the interface
pre-up wlanconfig ath0 create wlandev wifi0 wlanmode sta
wpa-driver madwifi

# we configure wpa_supplicant.conf with our upstream APs info
wpa-roam /etc/wpa_supplicant/wpa_supplicant.conf

# define the WIFI interfaces
iface wireless1 inet dhcp
iface wireless2 inet dhcp
iface default inet dhcp

#*************************************************************************
now let's edit /etc/wpa_supplicant/wpa_supplicant.conf adding the info of our upstream APs
	ctrl_interface=/var/run/wpa_supplicant
  ap_scan=1
	eapol_version=1
  fast_reauth=1

# Examples connecting to WEP APs

  network={
  ssid="WLAN_XX"
  key_mgmt=NONE
  wep_key0=5A303031333439354535323738
  wep_tx_keyidx=0
  id_str="wireless1"
  priority=6
  }

	network={
  ssid="WLAN_YY"
  key_mgmt=NONE
  wep_key0=43303033304441453532444641
  wep_tx_keyidx=0
  id_str="wireless2"
  priority=5
  }

# Example connecting to a WPA-Personal (PSK) APs
#	network={
# ssid="WPAPSK_SSID"
# key_mgmt=WPA-PSK
# psk="myWPA-PSK_PassPhrase"
#	id_str="wirelessWPA-PSK"
#	priority=10
# }

# Example connecting to Open APs
#	network={
# ssid="OPEN_SSID"
# key_mgmt=NONE
#	id_str="wirelessOPEN"
#	priority=5
# }

# More Examples at wpa_supplicant.conf(5) - Linux man page

# default open connection
network={
   key_mgmt=NONE
   }
At this point our Station side is able to roam among the upstream APs connecting to them and getting its IP parameters by DHCP. Now it is time to set the route between both Jeoss interfaces. Downstream the Jeoss AP side will have a static IP but the Station side will have a changing IP, then the route has to be updated every time the Jeoss Station side is assigned a new address.
This is easily achieved creating a DHCP client "hook"; this hook is really a shell script that it is automatically referenced by the DHCP client engine every time the client gets a new IP.
let' s create the file "repeater" (not execution permission required)
/etc/dhcp3/dhclient-exit-hooks.d/repeater
INTERNET_IF=ath0              # Jeoss Station interface (upstream)
LOCAL_NET=192.168.30.0        # Jeoss AP Network        (downstream)
LOCAL_MASK=255.255.255.0      # Jeoss AP Mask


nat_setup() {
# activate ip forwarding
/bin/echo "1" > /proc/sys/net/ipv4/ip_forward

# Flush any rules
iptables --table filter --flush FORWARD
iptables --table filter --flush INPUT
iptables --table filter --flush OUTPUT

# Drop default policies
iptables --table filter --policy INPUT ACCEPT
iptables --table filter --policy OUTPUT ACCEPT
iptables --table filter --policy FORWARD ACCEPT

# Free loopback connections
iptables --table filter --append INPUT --in-interface lo --jump ACCEPT
iptables --table filter --append OUTPUT --out-interface lo --jump ACCEPT

      # -------------------------#
      #         ROUTING
      # -------------------------#

iptables --table nat \
         --append POSTROUTING \
         --out-interface "$INTERNET_IF" \
         --source "$LOCAL_NET"/"$LOCAL_MASK" \
         --jump SNAT \
         --to-source "$new_ip_address"

#logger "RepeaterNatSetup: New rule set; If: $interface Reason: $reason"

}

repeater_nat_setup() {
#logger "RepeaterNatSetup: Hook; If: $interface Reason: $reason"

if [ $interface = $INTERNET_IF ]; then

	case $reason in
      BOUND | RENEW | REBIND | REBOOT )
      nat_setup
      ;;
  esac
fi
}

repeater_nat_setup
Jeoss AP side
On the Jeoss AP side we have to:
- Transform our ath1 radio into an AP
- Run DHCP server services on ath1
let's (partially) edit /etc/network/interfaces considering ath1 is our AP side radio
# The ath1 AP Downstream connection***************************************
auto ath1
iface ath1 inet static

# ensure ath1 is down (never fails because of "true")
pre-up wlanconfig ath1 destroy || true

# set up the ath1 device in AP mode before bringing up the interface
pre-up wlanconfig ath1 create wlandev wifi1 wlanmode ap

# set AP specific data
wireless-channel 8
wireless-essid JeossAP
wireless-key 6A656F7373
address 192.168.30.1
network 192.168.30.0
netmask 255.255.255.0
broadcast 192.168.30.255

# madwifi AP settings
up madwifiAP.sh ath1

# remove the ath1 device when bringing the interface down
post-down wlanconfig ath1 destroy
#*************************************************************************
Now its time to set the DHCP server using dnsmask. Dnsmasq is a lightweight, easy to configure, DNS forwarder and DHCP server, designed to provide DNS (and optionally DHCP) services to a small-scale network. It results perfect for our DHCP server needs.
let's edit /etc/dnsmasq.conf adding the following uncommented lines
# If you want dnsmasq to listen for DHCP and DNS requests only on
# specified interfaces (and the loopback) give the name of the
# interface (eg eth0) here.
# Repeat the line for more than one interface.
interface=ath1

# Uncomment this to enable the integrated DHCP server, you need
# to supply the range of addresses available for lease and optionally
# a lease time. If you have more than one network, you will need to
# repeat this for each network on which you want to supply DHCP
# service.
dhcp-range=192.168.30.31,192.168.30.40,255.255.255.0,12h
finally the /etc/networks/interface file considering there is an additional Ethernet interface it will look like:
# The loopback network interface
   auto lo
   iface lo inet loopback

# The Ethernet network interface
   auto eth0
   iface eth0 inet dhcp

auto eth0:0
   iface eth0:0 inet static
   address 192.168.20.2
   netmask 255.255.255.0
   broadcast 192.168.20.255
   #    gateway 192.168.20.1   # it has to be commented


# The ath0 Station Upstream connection************************************
# "manual" is required
iface ath0 inet manual

# ensure ath0 is down (never fails because of || "true")
pre-up wlanconfig ath0 destroy || true

# set up the ath0 device in sta mode before bringing up the interface
pre-up wlanconfig ath0 create wlandev wifi0 wlanmode sta
wpa-driver madwifi

# we configure wpa_supplicant.conf with our upstream APs info
wpa-roam /etc/wpa_supplicant/wpa_supplicant.conf

# define the WIFI interfaces
iface wireless1 inet dhcp
iface wireless2 inet dhcp
iface default inet dhcp

#*************************************************************************

# The ath1 AP Downstream connection***************************************
auto ath1
iface ath1 inet static

# ensure ath1 is down (never fails because of "true")
pre-up wlanconfig ath1 destroy || true

# set up the ath1 device in AP mode before bringing up the interface
pre-up wlanconfig ath1 create wlandev wifi1 wlanmode ap

# set AP specific data
wireless-channel 8
wireless-essid JeossAP
wireless-key 6A656F7373
address 192.168.30.1
network 192.168.30.0
netmask 255.255.255.0
broadcast 192.168.30.255

# madwifi AP settings
up madwifiAP.sh ath1

# remove the ath1 device when bringing the interface down
post-down wlanconfig ath1 destroy
#*************************************************************************
Now it's time to reboot and give a try to our new WIFI repeater.
NOTE1: This set-up requires a Jeoss install + the included optional collections "Madwifi-ng" and "Router A"
NOTE2: This set-up was extensively tested with Wistron CM9, Ubiquiti XR2, and Engenius EMP-8603 radios.
NOTE3: The second radio can be replaced by an Ethernet interface and the same set-up works perfect with wired instead of wireless capabilities downstream.
NOTE4: Remember when fine tuning WIFI set-ups that radios are small computers; when something goes wrong with them simply by "soft" rebooting the host (#sudo reboot) might not put them back to work properly. A power-off/power-on cycle sometimes is mandatory when dealing with them, specially on SBC (Single Board Computers) and the like.