Serva PXE/BINL - AN04: Custom menu
How to customize to your needs Serva's automatically created menu.
The objective of this document is to show you a step-by-step guide on how to edit the automatically created \pxeserva.cfg\menu.def including examples of commonly needed customizations.
Procedures described in this document require Serva "Pro"
Serva PXE/BINL - Application Note Set
PXE/BINL - AN01: Windows Network Install - Basis
PXE/BINL - AN01.1: Windows Network Install - WDS OSs
PXE/BINL - AN01.2: Windows Network Install - RIS OSs
PXE/BINL - AN02: Windows Network Install (Adv) & WinPE Boot
PXE/BINL - AN03: Non-Windows Boot/Install
PXE/BINL - AN04: Custom menu
PXE/BINL - AN05: Windows Network Image Capture & Deploy
PXE/BINL - AN06: Windows Network Image Capture & Deploy on ARM
0 Index
1 Requirements
1.1 Required Software
1.1.1 Microsoft Windows Serva 4.6.0 "Pro" or higher.
1.2 Assumed knowledge
1.2.1 Serva PXE/BINL - AN01: Windows Install
1.2.2 PXESERVA/PXELINUX basics.
2 Introduction
Serva Boot Manager based (BM_Mode=1) PXE boot/install menu system is based on Syslinux.
A PXE client declares its pre-OS runtime environment at boot within its initial DHCP request by including the DHCP Option 93 (RFC 4578 and DHCPV6 Processor Architecture Types). Serva DHCP/proxyDHCP service parses client's DHCP Option 93 and provides to the client the path of the corresponding booting Boot Manager taking into account the current BINL Boot Manager Mode.
| DHCP Option 93 | Client's pre-OS runtime |
|---|---|
| 0 | x86 BIOS |
| 6 | x86 UEFI |
| 7 | x64 UEFI |
| 9 | EBC |
| 10 | ARM 32-bit UEFI |
| 11 | ARM 64-bit UEFI |
A PXE booting station initially creates and displays its root-level boot/install menu by parsing the commands and parameters contained within the TFTP retrieved menu definition file correspondingly located at:
C:\SERVA_REPO\BM\PXESERVA\BIOS\pxeserva.cfg\menu.def
C:\SERVA_REPO\BM\PXESERVA\EFI64\pxeserva.cfg\menu.def
C:\SERVA_REPO\BM\PXESERVA\EFI32\pxeserva.cfg\menu.def
C:\SERVA_REPO\BM\PXESERVA\EFIARM64\pxeserva.cfg\menu.def
C:\SERVA_REPO\BM\PXESERVA\EFIARM32\pxeserva.cfg\menu.def
On Serva’s side, BINL services, automatically create and maintain the different menu.def files using the script language described in this document.
When required (i.e. when adding a new asset under Serva control, removing an existent one, etc.) Serva “Community” will automatically update menu.def files by overwriting any existent previous version of them. Serva “Pro” on the other hand, includes a menu editing engine that is aware of and will keep user added nested sub-menus, and other menu customizations.
| Note |
|---|
|
2.1 File Format
A Serva created menu.def is a case insensitive text-only file that can be divided in three clearly distinctive consecutive sections:
- Global settings
- Root-level menu container definition.
- Root-level menu entry definition list.
Serva automation initially creates and arranges all the menu entries corresponding to Serva’s assets within the root-level menu container. However, users can later on manually edit menu.def and not only alter Serva’s default menu entry order but also i.e. build a hierarchic menu system by manually interleaving and populating the required submenu containers. For those interested in customizing Serva’s menu system it is highly recommended to initially analyze Serva’s created menu.def files with this Application Note and the PXESERVA Menu Definition Reference Guide in-hand.
2.2 Command Format
The Command Names have a simple format where up to 2 consecutive Command Identifiers can be followed by the Command Payload when required.
[<space/Tab>]<CI_1>[<space/Tab><CI_2>][<space/Tab>Command Payload]<EOL>
| Warning |
|---|
| When the command payload is a text string for screen displaying it cannot contain TABs. |
3 Supported Commands
Please see the PXESERVA Menu Definition Reference Guide
4 Customizations
4.1 Menu lay-out
Just alter the corresponding menu container definition variables taking the following diagram as reference.
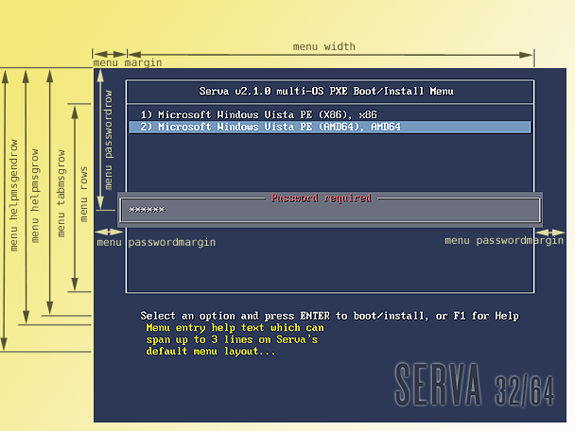
Fig 1: Menu lay-out variables
i.e. reducing the password input box by increasing menu passwordmargin from default 3 to 10
menu passwordmargin 10
4.2 Menu Title
Just alter the menu title variable.
menu title This is my custom title
4.3 Menu entry order
A typical automatically created menu entry is a sequence of commands beginning with LABEL. Automatically created entries are separated by an empty line just for cosmetic reasons.
LABEL   WIA_WDS\w8_ent_64\
   menu label   ^  1) Windows 8 Enterprise, AMD64
   kernel       pxechain.cbt
   append       ::WIA_WDS\w8_ent_64\_SERVA_\pxeboot.n12

LABEL   WIA_WDS\w7_ult_32\
   menu label   ^  2) Windows 7, x86
   kernel       pxechain.cbt
   append       ::WIA_WDS\w7_ult_32\_SERVA_\pxeboot.n12
Altering the entry positioning implies to move the menu entry corresponding command sequence to the desired new location within the menu structure.
i.e. we invert the menu entry order here
LABEL   WIA_WDS\w7_ult_32\
   menu label   ^  2) Windows 7, x86
   kernel       pxechain.cbt
   append       ::WIA_WDS\w7_ult_32\_SERVA_\pxeboot.n12

LABEL   WIA_WDS\w8_ent_64\
   menu label   ^  1) Windows 8 Enterprise, AMD64
   kernel       pxechain.cbt
   append       ::WIA_WDS\w8_ent_64\_SERVA_\pxeboot.n12
| Note |
|---|
| Do not worry about the menu entry numbering; Serva will automatically correct it when restarted. If for any reason you want to prevent Serva auto-numbering an specific entry, just make sure its menu label command payload begins with "^ " i.e. ^ This label will not be auto-numbered |
4.4 Menu entry separator
The command menu separator adds an empty line between two menu/sub-menu entries.
i.e. between two menu entries.
LABEL   WIA_WDS\w8_ent_64\
   menu label   ^  1) Windows 8 Enterprise, AMD64
   kernel       pxechain.cbt
   append       ::WIA_WDS\w8_ent_64\_SERVA_\pxeboot.n12

menu separator

LABEL   WIA_WDS\w7_ult_32\
   menu label   ^  2) Windows 7, x86
   kernel       pxechain.cbt
   append       ::WIA_WDS\w7_ult_32\_SERVA_\pxeboot.n12
4.5 Menu entry Title
| Note |
|---|
| This property has been updated since Serva v4.0.0 |
NWAs (non-Windows Assets) define and customize its menu entry title when creating their corresponding ServaAsset.inf file. Since Serva v4.0.0WDS (Windows Assets) can override their default menu entry also by creating their own ServaAsset.inf file which must be placed right under the asset's Head directory.
WDS Menu entry name override example:
;-Serva v3.0 Asset Information File

[PXESERVA_MENU_ENTRY]
asset    = My WDS Asset custom name
| Warning |
|---|
| Do not override WDS names by editing menu.def files; Create the corresponding ServaAsset.inf file instead. |
4.6 Menu entry Help
Just add up to 3 lines of text surrounded by the command sequence text help / endtext
LABEL   WIA_WDS\w8_ent_64\
   menu label   "This is my entry custom label"
   kernel       pxechain.cbt
   append       ::WIA_WDS\w8_ent_64\_SERVA_\pxeboot.n12
   text help
    Menu entry help text which can
    span up to 3 lines on Serva's
    default menu layout...
   endtext
4.7 Sub-Menu
A sub-menu is easily created by framing the corresponding menu entries with the command sequence MENU BEGIN / MENU END
MENU BEGIN   My Sub-Menu Title

   LABEL   WIA_WDS\w8_ent_64\
      menu label   ^  1) Windows 8 Enterprise, AMD64
      kernel       pxechain.cbt
      append       ::WIA_WDS\w8_ent_64\_SERVA_\pxeboot.n12

   LABEL	WIA_WDS\w7_ult_32\
      menu label   ^  2) Windows 7, x86
      kernel       pxechain.cbt
      append       ::WIA_WDS\w7_ult_32\_SERVA_\pxeboot.n12

MENU END
| Notes |
|---|
|
4.8 Sub-Menu custom Background
Sub-menus can define custom backgrounds by adding the menu background command followed by either a color definition or the path\filename of an image file (normally a 640x480 pixels PNG or JPG)
MENU BEGIN    My Sub-Menu Title
menu background   pxeserva.cfg\myBkgnd.png

   LABEL	WIA_WDS\w8_ent_64\
      menu label   ^  1) Windows 8 Enterprise, AMD64
      kernel       pxechain.cbt
      append       ::WIA_WDS\w8_ent_64\_SERVA_\pxeboot.n12

   LABEL   WIA_WDS\w7_ult_32\
      menu label   ^  2) Windows 7, x86
      kernel       pxechain.cbt
      append       ::WIA_WDS\w7_ult_32\_SERVA_\pxeboot.n12

MENU END
| Warning |
|---|
| The root level menu default background cannot be replaced. |
4.9 Password Protection
Sub-menus and menu entries can be easily password protected by adding the command menu passwd taking as argument the corresponding password hash.
MENU BEGIN   My Sub-Menu Title
menu passwd  $4$KR4Oz7c5$iCbcWCHeCorBEC1nZ5oqBV5Z3sg$

   LABEL   WIA_WDS\w8_ent_64\
      menu label   ^  1) Windows 8 Enterprise, AMD64
      menu passwd  $4$O4N7ax23$SaXuu4J4LWDDop8kSMAIgpYjRsM$
      kernel       pxechain.cbt
      append       ::WIA_WDS\w8_ent_64\_SERVA_\pxeboot.n12

   LABEL   WIA_WDS\w7_ult_32\
      menu label   ^  2) Windows 7, x86
      menu passwd  $4$Q7H2am1d$pnmznxy0wpbEf1/b/JCkxZ/jgZA$
      kernel       pxechain.cbt
      append       ::WIA_WDS\w7_ult_32\_SERVA_\pxeboot.n12

MENU END
4.10 Non-Serva Menu Entries
There are situations when you might want to add a menu entry that does not correspond to a Serva asset. On those cases remember the rules for the "LABEL MenuEntry_Id" command:
"User-created menu entries are free to use any MenuEntry_Id value as far as they are unique and never a valid Serva_asset_path".
i.e. the typical entry that allows to boot from client's HDD.
LABEL    boot_hdd
   menu label   Boot from local HDD
   localboot    0
   append       -
4.11 Serva RS232-Menu
There are several situations when you might need to install an OS on a head-less systems (no-keyboard/no-monitor), i.e. when probably installing some server OSs, Native Hypervisors, embedded devices, batch unattended installations, etc. In those cases we can rely on Serva's ability to simultaneously display its menu through a serial connection. This is done by adding a couple of commands at the beginnings of the menu.def file.
i.e. commands for Serva displaying a text version of its menu on COM 1 at 115200 bps.
############################################################################
# Serva v2.1.0 multi-OS PXE Boot/Install Menu definition
#  by Patrick Masotta © 2010-2013
############################################################################

SERIAL   0 115200 0
CONSOLE  1
| Note |
|---|
| Interactively installing OSs on headless systems through RS-232 requires OS support |
7 Troubleshooting
7.1 Serva will respect your custom entries, then there is always the risk of breaking things by overwriting/deleting some of Serva's required menu parameters. If anything goes wrong just erase menu.def; Serva will automatically create a new working copy for you. It is always a good idea editing on small steps and testing if the small change works before to move ahead. Virtualized PXE clients are very handy when polishing your custom made menu.def.
7.2 Menu displayed strings and TABs
Several menu commands take displayable strings as payload i.e.
menu label Boot from local HDD
In this case "Boot from local HDD" will be displayed in the screen as the corresponding menu entry label. These kind of strings cannot contain TABs. If a TAB makes it to the screen it would break menu's layout. In case you forget the rule Serva will automatically convert every TAB into a single SPACE but is always better if you know/apply the rule.
8 Final words
Serva PXE/BINL custom menu provides endless alternatives and sure you will enjoy its capabilities.
If you are a Serva Community user and you find it useful please consider purchasing Serva Pro. Non-personal or commercial use of Serva always requires a Serva Pro license (see Serva's download page for further details).
Serva bugs, comments, or ideas on how to improve the information contained in this document please contact us here.
| Updated | 05/31/2022 |
| Originally published | 02/01/2013 |