PXE/BINL - AN01: Windows Network Install - Basis
Starting an automated network install of anything from Windows 2000 to Windows 10 taking no more than 15 minutes and a ~4 MB download.
The objective of this document is to show you the first steps on how to perform simple network installations of Microsoft's OSs neither requiring to follow cryptic procedures nor being dependant on Microsoft’s RIS/WDS/WAIK/ADK suites.
Procedures described in this document do not require Serva "Pro"
Serva PXE/BINL - Application Note Set
PXE/BINL - AN01: Windows Network Install - Basis
PXE/BINL - AN01.1: Windows Network Install - WDS OSs
PXE/BINL - AN01.2: Windows Network Install - RIS OSs
PXE/BINL - AN02: Windows Network Install (Adv) & WinPE Boot
PXE/BINL - AN03: Non-Windows Network Boot/Install
PXE/BINL - AN04: Custom menu
PXE/BINL - AN05: Windows Network Image Capture & Deploy
PXE/BINL - AN06: Windows Network Image Capture & Deploy on ARM
0 Index
1 Requirements
1.1 Required Software
1.1.1 Microsoft Windows Serva 5.0.0 or higher.
1.1.2
Microsoft Install CD/DVD/ISO of the OSs you want to network install.
1.2 Required OS to run Serva
Windows 2000 to Windows 10 including all the Server Versions.
1.3 Assumed knowledge
1.3.1 Setting PC UEFI/BIOS parameters.
1.3.2
Creating Microsoft network shares.
2 Definitions
Let's define some key terms used on this and following documents.
2.1 BIOS: The BIOS (Basic Input/Output System) is a PC pre-OS environment, a type of firmware mainly used to initialize, test the system hardware components, and to load a boot manager or an operating system boot loader from a mass memory or network device.
2.2 EFI/UEFI: The EFI (Extensible Firmware Interface) initially introduced by Intel in 1998 by 2005 became an industry-wide driven effort known as UEFI (Unified Extensible Firmware Interface). It is designed as a successor to BIOS, aiming to address its technical shortcomings. In this document we use the terms "EFI" and "UEFI" as synonyms.
2.3 PXE: The Pre-boot eXecution Environment (PXE, pronounced pixie) was introduced by Intel as part of the Wired for Management framework. It is described in the specification (v2.1) published by Intel and Systemsoft on September 20, 1999. PXE is an environment to boot computers from a server using a network device independently of available mass storage devices or installed operating systems. It relies mainly on DHCP and TFTP services and it is implemented either as a Network Interface Card (NIC) BIOS extension or today in modern devices as part of their UEFI firmware. In this document we use the terms "PXE boot" and "Network boot" as synonyms.
2.4 NBP: A Network Boot Program or Network Bootstrap Program (NBP) is the first file downloaded and executed as part of the Pre-Boot Execution Environment (PXE) boot process. In multi boot PXE the NBP is a Boot Manager (BM) able to display a menu of the available booting options.
2.5 RIS: Back in the days of Windows 2000 the first Microsoft's net install attempts were carried out by the Remote Installation Services (RIS). After a couple of updates RIS ended up net installing Windows 2000, Windows XP, and Windows Server 2003. It can be considered PXE based with some MS custom extensions.
2.6 WDS: The Windows Deployment Service (WDS) is the updated and redesigned version of RIS. It is able to perform network installs of Windows Vista and up. It can also install the old RIS OSs when their images are conveniently assembled.
2.7 BINL:
The Boot Information Negotiation Layer (BINL) service is a key component of RIS and WDS. It includes certain preparation processes and a network protocol that could be somehow considered a Microsoft crafted DHCP extension.
2.8 BINL+: Serva BINL extension able to process Non-Windows systems. Serva documentation refers to it just as BINL.
2.9 WID: A Windows Install Distribution (WID) is the whole set of files and its directory structure as it is found within any Microsoft OS install CD, DVD, or ISO file.
2.10 WIA: A Serva Windows Installation Asset or just Windows Asset (WIA) is either a WID, or a stand alone Windows PE bootable image, successfully processed by Serva BINL. A WIA can be offered for network boot/install by Serva's PXE/BINL net services.
2.11 NWA: A Serva Non-Windows Asset (NWA) is any Non-Windows based bootable/installable distribution successfully processed by Serva BINL. A NWA can be offered for network boot/install by Serva's PXE/BINL net services.
3 Stage
3.1- Hardware lay-out.
a) PC running Serva.
b) Net booting target PCs (PXE clients) installing over the net anyone of the available versions of MS Windows.
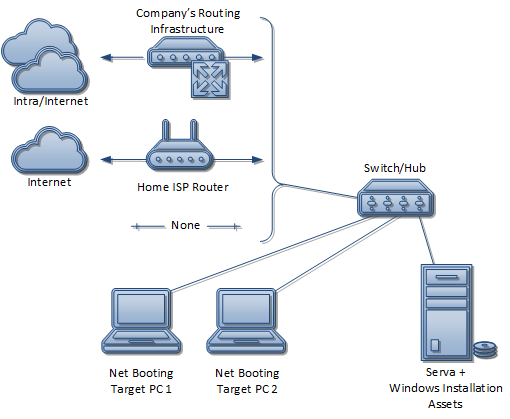
Fig 1: Hardware Lay-out
| Notes |
|---|
|
3.2- PXE Client UEFI/BIOS set-up.
When a PC boots-up its pre-OS environment (UEFI) or basic input/output system (BIOS) firmware turns the PC hardware into a functioning system able to boot an OS. PC makers have increasingly been replacing BIOS with the newer Unified Extensible Firmware Interface (UEFI).
Within the UEFI/BIOS environment there is a parameter called boot option priority list which dictates the order in which the PC will attempt to boot from enumerating its ready to boot devices. They could be local M.2/mSATA/SATA/PCIe/PCI/SCSI/USB SSD/HDDs, CD/DVD drives, or "Network Cards". In the last case the PC firmware downloads to RAM and runs a Network Bootstrap Program (NBP) starting a boot/install process directly from the network. PCs trying to perform a network boot/install must set their boot option priority list headed by the network card device that connects to the booting network.
| Note |
|---|
| The NBP file is the 1st piece of network retrieved binary code that takes control right after the PXE clients boots-up. In Serva's PXE/BINL case the NBP is a Boot Manager (BM) which displays a menu of the available boot/install options. |
Virtual machines implement emulated UEFI/BIOS environments where the boot option priority list can also be defined.

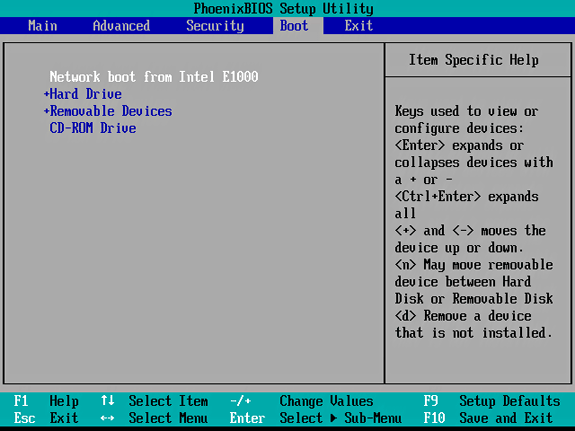
Fig 2: Boot option priority list configured for Network Boot on UEFI and BIOS PCs
Most UEFI systems include a "Legacy Mode" also known as "Compatibility Support Module (CSM) Mode" which can alternatively emulate the old BIOS environment. Serva BMs (pxeserva.0, pxeserva.efi, and bootmgfw.efi) are able to natively boot and work on UEFI and BIOS systems not requiring "Legacy Mode".
| Warning |
|---|
|
3.3- DHCP server vs. proxyDHCP.
A net booting PC needs to gather basic network information as soon as it powers up:
- IP address
- Network mask
- Additional DHCP options (if any)
- IP address of the TFTP server that hosts the bootstrap loader
- Boostrap loader File Name
The first three items are regular DHCP parameters and the last two are the specific BOOTP/PXE DHCP extensions.
At this point we know we need a DHCP server; Serva is a DHCP server. But, what if we already have a working DHCP infrastructure on our network? Let's go even further; what if we have no access/permission to change its configuration at all? Here are the 2 scenarios explained:
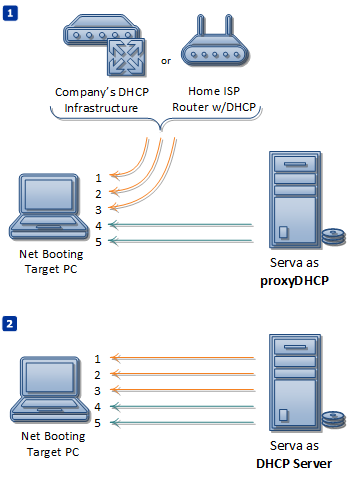
Fig 3a: proxyDHCP vs DHCP server scenarios
In the first case we already have a working DHCP server assigning and administering IP addresses but not providing booting information, then Serva acting just like a "proxyDHCP" will automatically provide the required complementary PXE info only to booting PXE clients:
- IP address of the TFTP server that hosts the bootstrap loader
- Boostrap loader File Name
In the second case Serva behaves as DHCP server providing all the needed information.
| Notes |
|---|
|
3.4- Net Booting PCs and Serva on different VLANs or Subnets.
When the Net Booting PCs and the DHCP Server/proxyDHCP are located on different VLANs or Subnets the broadcast components of the DHCP traffic are naturally blocked by the networking gear (switch/router) joining the corresponding broadcast domains. In this case, for the DHCP protocol to work properly, the involved networking devices must have the DHCP Relay agent (IP Helper on Cisco terminology) enabled.
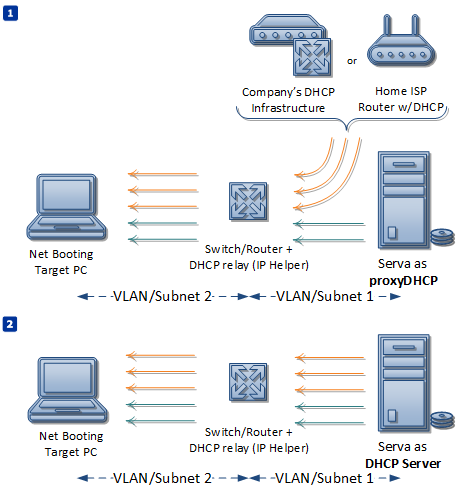
Fig 3b: Net Booting PC and Serva on different Subnets/VLANs
When configuring the DHCP Relay agent (IP Helper) we must provide the IP address (Cisco command ip helper-address) of the DHCP Server and proxyDHCP (if used). This way the relay agent can:
- Take the DHCP broadcast requests from the source broadcast domain and forward them as unicast requests specifically targeting the defined DHCP Server and/or proxyDHCP (if used).
- Take the DHCP Server/proxyDHCP unicast answers and forward them back to the corresponding source broadcast domain as regular broadcast DHCP traffic.
4 Repository
Serva is a single exe that does not require installation. Let's consider you run Serva from C:\SERVA\ directory. Serva requires full read/write permissions on its running directory in order to keep updated its configuration file Serva.ini. When running Serva.exe you can reach its menu by either typing [Alt]-[Space] or right-clicking its title bar. Alternatively you can directly access Serva's Settings dialog box by double-clicking the application icon at the title bar.
4.1- Configuring Serva's TFTP server.
The initial stages on a network install require TFTP file transfers, then we start Serva and go to the TFTP Settings tab. Here we mainly define the directory that will act as TFTP root. This directory in fact will become Serva's "repository" root directory holding all the installation assets that Serva will serve to net booting clients. Serva needs full read/write permissions on this directory; i.e. C:\SERVA_REPO\
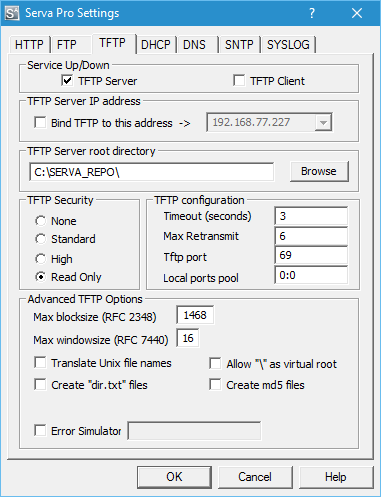
Fig 4: TFTP server settings
| Notes |
|---|
|
| Warning |
|---|
| Serva TFTP service will not run correctly on a PC that already has a TFTP server running |
For more details on TFTP please see "Advanced Topics on TFTP".
4.2- Configuring Serva's proxyDHCP/DHCP server.
4.2.1- BINL Service Add-on.
Serva automated network boot/install of Windows (and also non-Windows) assets requires the Serva BINL service add-on checked. Remember BINL is not just only a DHCP protocol extension but also a set of preparation and maintenance procedures run every time Serva is started. When Serva BINL is checked Serva takes control of several PXE parameters including "Boot File" (automatically set to pxeserva.0/pxeserva.efi). In non-automated scenarios where you might, for some reason, need full control over the Preboot Execution Environment please remember to uncheck the BINL checkbox.
4.2.2- proxyDHCP vs DHCP server.
Remember what we said before; if you already have a working DHCP server then just select the proxyDHCP mode. On this mode you will not be required to define IP address assignation related parameters and those dialog box fields will be automatically grayed-out.
| Warning |
|---|
| Installing RIS OSs requires Serva DHCP protocol always on proxyDHCP mode. This also implies the need of an external DHCP server for regular IP/MASK assignation. |
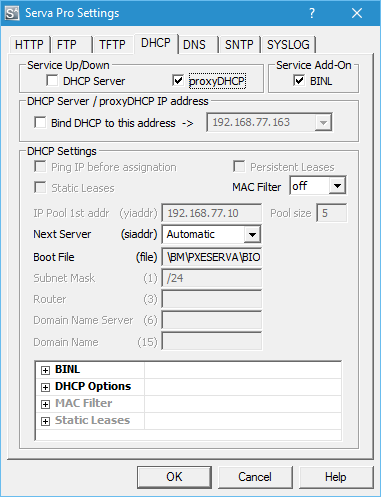
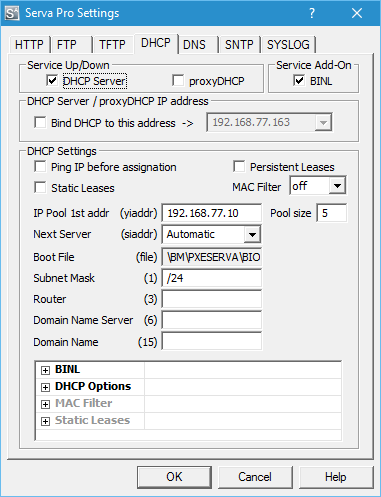
Fig 5-6: proxyDHCP vs DHCP server settings
| Notes |
|---|
|
| Warning |
|---|
| Serva DHCP/proxyDHCP services will not run correctly on a PC that already has a DHCP server running. |
4.2.3- MAC Filter.
For advanced DHCP scenarios Serva DHCP/proxyDHCP services includes MAC filter capabilities. The MAC filter engine allows Serva to discriminate and decide which clients will or will not receive Serva DHCP/ProxyDHCP services based on their MAC addresses.
4.2.3.1- Graphical user interface settings.
Serva's DHCP Setting tab allows quickly to define up to 10 MAC filter entries.
The MAC filter combo box field configures the engine as:
MAC Filter:
    Off     - All DHCP requests are honored.  (default)
    Accept  - Only requests with MACs that match a predefined set of addresses
                are honored.
    Ignore  - Only requests with MACs that do not match a predefined set of
                addresses are honored.
The set of MAC addresses is made of up to 10 entries of the form:
MAC[|MASK] i.e.
[+] BINL
[+] DHCP Options
[-] MAC Filter
     ├ opt_1  | 00:01:02:03:04:05:06
     ├ opt_2  | 00:01:02:03:04:05:06|FF:FF:FF:FF:00:00
      ...
     └ opt_10 |
[+] Static Leases
In the first case all of the bits of the MAC address are required for producing a match. In the second case every bit of the MASK set to 1 anchors as “required-for-matching” the corresponding bit on the preceding MAC address. This way it's very simple to define a group of related MAC addresses just in a single entry.
4.2.3.2- Whitelist/Blacklist settings.
When 10 MAC filter entries are not enough it is possible to define unlimited number of entries by manually creating a whitelist or blacklist file next to Serva.exe (this feature requires "Serva Pro")
ServaDHCP_mac_wl.def   MAC address Whitelist
ServaDHCP_mac_bl.def   MAC address Blacklist
The file format is just a plain ASCII list of Ethernet MAC addresses i.e.
7B:99:4F:11:67:4F
5A:D8:73:5F:11:98
5B:F7:6C:19:8F:2B
72:0E:64:E9:70:DB
D4:47:7A:B1:20:FD
When either a whitelist or blacklist file exists next to Serva.exe the GUI defined MAC filter entries are ignored.
When ServaDHCP_mac_wl.def exists next to Serva.exe only clients in this list will receive DHCP/proxyDHCP services.
When ServaDHCP_mac_bl.def exists next to Serva.exe only clients not in this list will receive DHCP/proxyDHCP services.
If both files are present next to Serva.exe an error condition is triggered.
For more details on DHCP please see "Advanced Topics on DHCP and related protocols".
4.3- Quit and Restart Serva.
Every time we quit and restart Serva (when the BINL Service Add-on is checked) the application will run on init all the BINL preparation/maintenance processes. At this point, on restart, we'll see Serva BINL creates its repository initial empty structure.
| Notes |
|---|
|
5 Final words
At this point we have covered the initial steps of the OS net deployment process with Serva. Depending on your target OS please continue reading:
PXE/BINL - AN01.1: Windows Network Install - WDS OSs
PXE/BINL - AN01.2: Windows Network Install - RIS OSs
Serva bugs, comments, or ideas on how to improve the information contained in this document please contact us here.
| Updated | 10/20/2020 |
| Originally published | 05/08/2012 |