PXE/BINL - AN02: Windows Network Install (Adv) & WinPE Boot
Starting an automated network boot of Windows PE or an advanced network install of anything from Windows 2000 to Windows 10, taking no more than 15 minutes and a ~4 MB download.
The objective of this document is to show you how to handle Microsoft Windows unattended PXE install scenarios, PXE booting WindowsPE, and finally setting Serva as a single PXE front-end simultaneously targeting Serva's own repository, Microsoft WDS/MDT/SCCM repositories, and more.
Procedures described in this document require Serva "Pro"
Serva PXE/BINL - Application Note Set
PXE/BINL - AN01: Windows Network Install - Basis
PXE/BINL - AN01.1: Windows Network Install - WDS OSs
PXE/BINL - AN01.2: Windows Network Install - RIS OSs
PXE/BINL - AN02: Windows Network Install (Adv) & WinPE Boot
PXE/BINL - AN03: Non-Windows Network Boot/Install
PXE/BINL - AN04: Custom menu
PXE/BINL - AN05: Windows Network Image Capture & Deploy
PXE/BINL - AN06: Windows Network Image Capture & Deploy on ARM
0 Index
- Requirements
- Unattended Installs
- PXE Booting WindowsPE executives
- PXE Booting MS WDS, MDT, and SCCM repositories
- PXE Booting PE based Symantec Ghost clients
- PXE Multi-Repository Integration
- PXE Booting PE based recovery/test tools
- Troubleshooting
- Final Words
1 Requirements
1.1 Required Software
1.1.1 Microsoft Windows Serva 5.0.0 "Pro" or higher.
1.1.2
Microsoft Install CD/DVD/ISO of the OSs you want to network install.
1.1.3
WIM files you want to network boot.
1.1.4 Microsoft WAIK/Windows ADK.
1.1.5 Microsoft
WDS/MDT/SCCM boot WIMs and their repositories.
1.2 Assumed knowledge
1.2.1 Serva PXE/BINL - AN01: Windows Install
1.2.2 WAIK/Windows ADK tools.
1.2.3
WDS/MDT/SCCM.
2 Unattended Installs
In this chapter we explore Serva's unattended install capabilities as an extension of the concepts developed on PXE/BINL - AN01.1: Windows Network Install - WDS OSs and PXE/BINL - AN01.2: Windows Network Install - RIS OSs
2.1 RIS OSs:
In this case the WIA unattended install capabilities are fully controlled by the corresponding \_SERVA_\winnt.sif. This file normally contains information about available RIS services, the destination computer, and the type of installation you are performing. In case of an unattended install it additionally becomes the answer file that holds the install automation data.
winnt.sif is initially created by Serva setting the networking parameters required by the net install process. Additionally when we include OEM drivers under \$OEM$\$1\Drivers\NIC\ Serva updates winnt.sif telling the OS being installed that there are certain directories containing OEM drivers ready to be processed.
Users that want to automate this kind of install have to populate winnt.sif with the desired unattended parameters considering a couple of points:
- Serva "Community" updates winnt.sif by overwriting the previous version of it. This means "non-Supporter" users have to manually re-enter their unattended settings after a Serva winnt.sif update. Serva "Supporter" on the other hand has an edition engine able to keep winnt.sif user added parameters.
- Serva "Pro" will respect your winnt.sif entries, then there is always the risk of breaking things by overwriting some of Serva's required parameters. If anything goes wrong just erase winnt.sif; Serva will automatically re-create a new working copy for you.
2.2 WDS OSs:
In this case the WIA unattended install capabilities are fully controlled by two answer files (BIOS_Unattend.xml and UEFI_Unattend.xml) containing the Windows installation settings used during Windows Setup. The files contain differentiated settings used by BIOS-based and UEFI-based booting clients. Remember the answer file for UEFI targets must create two additional partitions; the UEFI System Partition (ESP) and the Microsoft Reserved Partition (MSR).
The
BIOS_Unattend.xml and UEFI_Unattend.xml files can be created with the "Windows System Image Manager" ImgMgr.exe (from WAIK/ADK) and conveniently placed under the corresponding WIA's \$OEM$\$Boot$\$1 directory.
ServaPENet initial login to WIA_WDS_SHARE can be also automated by adding to both XML files the component "Microsoft-Windows-Setup" to the windowsPE pass with the following information:
AppliedConfigurationPass:  1 windowsPE
Component:                 Microsoft-Windows-Setup
Path:                      WindowsDeploymentServices/Login/Credentials

Settings:
Domain   = WIA_WDS_SHARE_DomainName     (populate only when required)
Password = WIA_WDS_SHARE_Password
Username = WIA_WDS_SHARE_Username
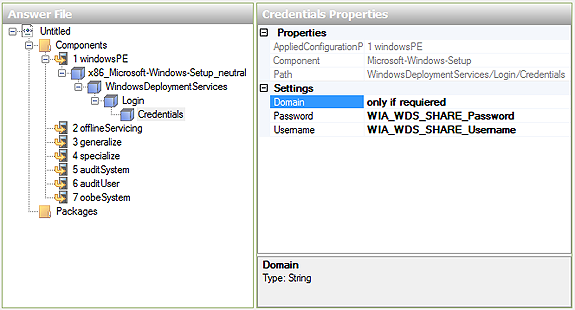
Fig 1: ImgMgr.exe ServaPENet unattended login parameters
2.2.1 For those users that only want to automate ServaPENet login and really do not want to deal with ImgMgr.exe creating XML files there is an alternative; Serva also parses WIA's \$OEM$\$Boot$\$1\Unattend.ini (plain text file) looking for ServaPENet login parameters:
[windowsPE-Setup-Login-Credentials]
;Domain  = WIA_WDS_SHARE_DomainName     (uncomment only when required)
Password = WIA_WDS_SHARE_Password
Username = WIA_WDS_SHARE_Username
2.2.2 For those users that want to automate ServaPENet login globally for all the served WDS OSs there is also an alternative by just creating a single Unattend.ini file right under WIA_WDS class directory i.e. C:\SERVA_REPO\WIA_WDS\Unattend.ini.
When installing i.e. Windows 10 64Bit, ServaPENet will look for its automated login parameters sequentially parsing the information contained within the following files:
BIOS Target:
- C:\SERVA_REPO\WIA_WDS\Unattend.ini
- C:\SERVA_REPO\WIA_WDS\Win10_64\$OEM$\$Boot$\$1\Unattend.ini
- C:\SERVA_REPO\WIA_WDS\Win10_64\$OEM$\$Boot$\$1\BIOS_Unattend.xml
UEFI Target:
- C:\SERVA_REPO\WIA_WDS\Unattend.ini
- C:\SERVA_REPO\WIA_WDS\Win10_64\$OEM$\$Boot$\$1\Unattend.ini
- C:\SERVA_REPO\WIA_WDS\Win10_64\$OEM$\$Boot$\$1\UEFI_Unattend.xml
ServaPENet first parses the Unattend.ini common to all the WDS WIAs, next it parses the WIA's own Unattend.ini, finally it looks for login credentials within WIA's own BIOS_Unattend.xml or UEFI_Unattend.xml depending on client's pre-OS environment.
The first existing file having valid parameters (non-empty Username and Password) is used and stops ServaPENet's parsing sequence.
Please consider Unattend.ini only for providing ServaPENet login credentials and know that it can be used side-by-side with BIOS_Unattend.xml/UEFI_Unattend.xml files i.e. in the case that you want globally set login parameters for all your WDS OSs
where some of them might have unattended parameters contained in their XXXX_Unattend.xml files. In those cases the login information will be taken from the global Unattend.ini and the rest of unattended parameters will be taken from the corresponding XXXX_Unattend.xml. When login parameters are taken from Unattend.ini, login credentials contained within XXXX_Unattend.xml (if any) will be just ignored.
2.2.3 Creating and testing Unattend Answer Files is a lengthy process that implies the creation of images and their corresponding booting media support (DVD). Even if you are not planning to use network deployment Serva can really help you testing your job. Just create XXXX_Unattend.xml with ImgMgr.exe directly saving it on \$OEM$\$Boot$\$1\XXXX_Unattend.xml, close/re-start Serva and in 15 seconds you will be able to test your just created XXXX_Unattend.xml by booting a PXE client; Very handy.
| Notes |
|---|
|
3 PXE Booting Windows PE executives
The Windows Preinstallation Environment (aka WindowsPE, WinPE) is a lightweight version of Windows mostly used on the early stages of the deployment of workstations and servers or in troubleshooting scenarios. This tiny version of Windows comes packed in bootable WIM files originally crafted with the "Windows Automated Installation Kit" (Windows AIK or WAIK)
or lately with the "Windows Assessment and Deployment Kit" (Windows ADK or WADK).
| Windows PE release | Operating system |
|---|---|
| 1.6 | Windows Server® 2003 with SP1 |
| 2.0 | Windows Vista® RTM |
| 2.1 | Windows Vista with SP1, Windows Server 2008 |
| 2.2 | Windows Vista with SP2, Windows Server 2008 with SP1 |
| 3.0 | Windows 7 RTM |
| 3.1 | Windows 7 with SP1 |
| 4.0 | Windows 8, Windows Server 2012 |
| 5.0 | Windows 8.1, Windows Server 2012 R2 |
| 5.1 | Windows 8.1 Update, Windows Server 2012 R2 |
| 10.0.10240.16384 | Built from Windows 10 v1507 code base. |
| 10.0.10586.0 | Built from Windows 10 v1511 code base. |
| 10.0.14393.0 | Built from Windows 10 v1607 code base. |
| 10.0.15063.0 | Built from Windows 10 v1703 code base. |
| 10.0.16299.15 | Built from Windows 10 v1709 code base. |
| 10.0.17134.1 | Built from Windows 10 v1803 code base. |
| 10.0.17763.0 | Built from Windows 10 v1809 code base. |
| 10.0.18362.1 | Built from Windows 10 v1903 code base. |
| 10.1.19041.1 | Built from Windows 10 v2004 code base. |
| 10.0.20348.1 | Built from Windows Server 2022 code base. |
| 10.0.22000.1 | Built from Windows 11, version 21H2 code base. |
| 10.0.22621.1 | Built from Windows 11, version 22H2 code base. |
| 10.0.25498.1 | Built from Windows Server, version 23H2 code base. |
| 10.0.26100.1 | Built from Windows 11, version 24H2 code base. |
| 10.0.28000.1 | Built from Windows 11, version 26H1 code base. |
Serva initially boots a WindowsPE (ServaBoot.wim) every time it installs a WDS OS and it is also able to boot stand alone WindowsPE executives. It only takes populating a "head" directory under \WIA_WDS with the corresponding bootable WIM file and a very small set of extra files.
i.e.
Where i.e. WinPE_32 and WinPE_64 are the user created head directories while winpe_32.wim and winpe_64.wim are the corresponding bootable WIMs.
Directory WinPE_32 holds:
- The WindowsPE file winpe_32.wim as it comes i.e. from Windows 10 ADK.
- The System Deployment Image boot.sdi as it comes from the WAIK/ADK or any WDS Windows Install Distribution DVD/ISO (\boot\boot.sdi) or in modern Boot.wim (Windows\Boot\DVD\EFI\boot.sdi).
Directory WinPE_64 holds:
- The WindowsPE file winpe_64.wim as it comes i.e. from Windows 10 ADK..
- The System Deployment Image boot.sdi as it comes from the WAIK/ADK or any WDS Windows Install Distribution DVD/ISO (\boot\boot.sdi) or in modern Boot.wim (Windows\Boot\DVD\EFI\boot.sdi).
- The Windows PXE Network Bootstrap Program pxeboot.n12 as it comes from WAIK/ADK or any WDS WIA (_SERVA_\pxeboot.n12).
- The Windows BIOS Boot manager bootmgr.exe as it comes from WAIK/ADK or any WDS WIA (_SERVA_\pxeboot.n12).
- The Windows UEFI64 Boot manager bootmgfw.efi as it comes from WAIK/ADK or any 64 bit WDS WIA (_SERVA_\bootmgfw.efi). This file is only required when booting UEFI clients.
| Notes |
|---|
|
Now lets talk a bit about Serva/BINL internals when booting WindowsPE. Serva PXE/BINL WDS booting process takes the following steps:
BIOS:
- A BIOS PXE client boots up and after the DHCP transaction the initial TFTP transfer loads the first Network Boot Program (NBP) pxeserva.0.
- pxeserva.0 transfers vesamenu.c32 and displays Serva's menu.
- When the user performs a WDS menu selection a second NBP \_SERVA_\pxeboot.n12 gets transferred and loaded.
- pxeboot.n12 TFTP transfers \_SERVA_\bootmgr.exe and the \_SERVA_\boot\BCD store.
- bootmgr.exe reads the BCD entries, then it TFTP transfers \_SERVA_\boot.sdi and the WindowsPE WIM image (i.e. winpe_64.wim).
- bootmgr.exe expands and loads in memory the WindowsPE WIM image, then begins booting it by calling into its Winload.exe.
- At this point the loaded WindowsPE executive could do many things like displaying a console window, perform a network connection to a remote repository to continue with an OS network install, load a test/recovery environment, etc. It all depends on how the WindowsPE was crafted.
Because of the above sequence, we can see there is a strong relationship between pxeboot.n12, bootmgr.exe and the WIM file (i.e. winpe_64.wim). In the early days of the WIM file format it was pretty common having WIM files that were not compatible with some versions of pxeboot.n12/bootmgr.exe. Since 2013 the WIM file format is pretty stable and WIM files and matching pairs of pxeboot.n12/bootmgr.exe can be exchanged fairly easily.
The bootmgr.exe performs the TFTP transfer of the WIM file which is about 150-200 Mb in size. This size is not small for a protocol like TFTP. Since Windows PE 2.1 bootmgr.exe is able to handle the TFTP negotiated variable windowsize (today RFC 7440) normally offering faster TFTP transfers on high quality networks. Serva's TFTP server module handles the windowsize variable; it always helps to use the "windowsize enabled" bootmgr.exe. If booting old WIMs you can check if your bootmgr.exe handles windowsize or not by opening the file with your favorite Hex editor and look for the word windowsize in plain ASCII.
UEFI64/UEFI32:
- An UEFI PXE client boots up and after the DHCP transaction the initial TFTP transfer loads the first Network Boot Program (NBP) pxeserva.efi.
- pxeserva.efi transfers vesamenu.c32 and displays Serva's menu.
- When the user performs a WDS menu selection TFTP transfers \_SERVA_\bootmgfw.efi and the \_SERVA_\boot\BCD store.
- bootmgfw.efi reads the BCD entries, then it TFTP transfers \_SERVA_\boot.sdi and the WindowsPE WIM image (i.e. winpe_64.wim).
- bootmgfw.efi expands and loads in memory the WindowsPE WIM image, then begins booting it by calling into its Winload.efi.
- At this point the loaded WindowsPE executive could do many things like displaying a console window, perform a network connection to a remote repository to continue with an OS network install, load a test/recovery environment, etc. It all depends on how the WindowsPE was crafted.
In the UEFI case bootmgfw.efi is easily exchangeable among the different UEFI enabled bootable WIM files and it is always able to negotiate the windowsize TFTP option for faster transfers.
| Notes |
|---|
|
In the example above we boot the 2 versions of winpe.wim coming with the Windows 10 ADK (Windows PE 10).
winpe_32.wim is booted using its internally contained pxeboot.n12, bootmgr.exe, and bootmgfw.efi.
winpe_64.wim is booted using an externally provided set of pxeboot.n12, bootmgr.exe, and bootmgfw.efi coming from i.e. a Windows 10 WIA.

When booting WIMs the text displayed on menu entries is gathered by Serva from the booting WIM itself. Unfortunately there are times when bootable WIMs:
a) Include a generic name i.e. "Microsoft Windows PE (x64)"
b) Include no name at all.
If Serva finds that the WIM name is either empty or contains the sentence "Microsoft Windows PE" it will use the "head" directory name as menu entry instead.
After Serva creates the booting menus you can always customize their entries with more suitable descriptions by manually editing:
C:\SERVA_REPO\BM\BIOS\pxeserva.cfg\menu.def
C:\SERVA_REPO\BM\EFI64\pxeserva.cfg\menu.def
C:\SERVA_REPO\BM\EFI32\pxeserva.cfg\menu.def
| Note |
|---|
| From a consistency point of view you should always initially try to boot letting Serva extract pxeboot.n12, bootmgr.exe, and bootmgfw.efi from within the bootable WindowsPE. Only in case of file extraction errors (missing files) you should think of providing them externally always as a matching set. |
3.1- OEM Driver injection.
Driver injection when booting WindowsPE executives works exactly the same as when installing WDS OSs. See "8.3.2- WDS OS OEM network drivers" at Serva PXE/BINL - AN01: Windows Install.
On a booting WIM the injected driver components will be available at X:\$WinpeDriver$\NIC\; but the WIM must include the code/script able to load them i.e. invoking Drvload.exe.
3.2- OEM component injection.
Serva is able to "recursively" inject components on a bootable WIM.
| Content under: | Copied to: | Example: |
|---|---|---|
| <head_dir>\$OEM$\$Boot$\$1 | %SYSTEMDRIVE% | X:\ |
4 PXE Booting MS WDS, MDT, and SCCM repositories
When we PXE install a WDS OS with Serva the process can be split on two different stages:
a) TFTP transferring and booting of the corresponding ServaBoot.wim (WindowsPE).
b)
Transferring of the OS components from Serva repository in order to continue with the OS install.
It is the booting ServaBoot.wim which has the information on how to network locate Serva repository and what to do with it.
Microsoft WDS, MDT and SCCM all use a similar strategy; they all produce booting WIMs, containing the information on how to network locate their repositories (stores) or DPs (SCCM Distribution Point), and know what to do with them.
If we would be able to PXE boot those WIM files with Serva we would get integrated within the same single menu, entries pointing to Serva's own assets with entries pointing to WDS, MDT, and SCCM "entry points". We certainly can do this by using what we just have learnt in 3 PXE Booting WindowsPE executives !
4.1- PXE Booting WDS repositories under Serva control.
From MSDN:
The Windows Deployment Services "client" is an application that runs within Microsoft Windows Preinstallation Environment (Windows PE), enabling you to select and install an install image from a Windows Deployment Services server. This application is, in fact, Setup.exe from Windows Vista with some additional functionality that is needed for network deployments. This mode differs from the normal Setup.exe mode in that the Windows Deployment Services client has the following features:
- Logic to interact with a Windows Deployment Services server to retrieve the list of available install images and perform the installation
- A unique set of user interface (UI) screens, including an authentication and credentials page
- The ability to handle more advanced unattended installation scenarios, including obtaining an unattend file from a Windows Deployment Services server and performing variable string replacement
- The ability to deploy install images from Windows 2000, Windows XP, and Windows 2003 along with Windows Vista and Windows Server 2008
While the above paragraph describes the WDS "deployment" windowsPE client there is also a similar WDS "capture" WindowsPE client. All these clients come in both 32 and 64 bit flavors.
4.1.1- Serva and WDS run on different PCs
The WDS booting WIMs must be created as "Discover Images" in order to be able to find the WDS server at boot.
a) Basically you just create a regular booting image within WDS, then right click on it and run “Create Discover Image…”. During this process you will be asked for WDS' IP address, NetBIOS name, or fully qualified domain name (FQDN).
b) Alternatively you can create regular booting images within WDS and later inject a WinPESHL.ini file (with Serva) containing the WDS location parameters.
[LaunchApps]
%SystemDrive%\sources\setup.exe /wds /wdsdiscover /wdsserver:<ServerName>

;Windows PE 3.0 and older
;%SystemDrive%\sources\setup.exe, "/wds /wdsdiscover /wdsserver:<serverName>"

; <ServerName> Specifies the name of the Windows Deployment Services server that
; the client should connect to. Note that <ServerName> can be an IP address, a
; NetBIOS name, or a fully qualified domain name (FQDN).
; For example:
; %SystemDrive%\sources\setup.exe /wds /wdsdiscover /wdsserver:192.168.1.30
The file WinPESHL.ini must be copied under
<head_dir>\$OEM$\$Boot$\$1\Windows\System32\
and re-start Serva for injection.
4.1.2- Serva and WDS run on the same PC
In this case the WDS booting WIMs do not need extra information; they will automatically contact the WDS server at the booting server IP address.
In this case it is specially necessary that WDS' DHCP and TFTP associated services stay OFF.
Depending on how you named your WindowsPE booting images within WDS you might have gotten something like this:
\Boot\x32\Images\WDS_Capture_WinPE_x32.wim
\Boot\x64\Images\WDS_Capture_WinPE_x64.wim
\Boot\x32\Images\WDS_Deploy_WinPE_x32.wim
\Boot\x64\Images\WDS_Deploy_WinPE_x64.wim
Take copies of the needed WIMs and put them under Serva control within their corresponding head directories as explained at 3 PXE Booting WindowsPE executives.
Next, just boot your PXE client.
| Note |
|---|
| Always remember turning WDS PXE capabilities off when booting the PXE client: WDS Server right click "Properties", click on the "PXE Response" tab, selecting "Do not respond to any Client". |
4.2- PXE Booting MDT repositories under Serva control.
Considering i.e. an updated MTD "MDTDemo" deployment share at C:\MDTDemo you should be able to find its booting images at:
C:\MDTDemo\Boot\LiteTouchPE_x86.wim
C:\MDTDemo\Boot\LiteTouchPE_x64.wim
Just take copies of the needed WIMs and put them under Serva control within their corresponding head directories as explained at 3 PXE Booting WindowsPE executives. Next just boot your PXE client.
| Note |
|---|
| MDT forces you to use Windows Server OSs for PXE because this capability is in fact provided behind the scenes by WDS which is a server-only component. If you need PXE initiated MDT functionality at locations where you do not have a Windows Server OS, you should probably consider Serva on Windows 7/8/10 as a neat and affordable solution. |
4.3- PXE Booting SCCM repositories under Serva control.
Considering i.e. a particular DP on your SCCM hierarchy:
a) Create an SCCM CD boot media ISO.
b) From the ISO extract the \Sources\boot.wim and put it under Serva control within its corresponding head directory as explained at 3 PXE Booting WindowsPE executives.
b) From the ISO copy the content under \SMS\DATA to:
<head_dir>\$OEM$\$Boot$\$1\SMS\DATA
c) Re-start Serva and
boot your PXE client.
| Note |
|---|
| SCCM forces you to host your DPs (Distribution Point) on Windows Server OSs for PXE because this capability is in fact provided behind the scenes by WDS which is a server-only component. If you need PXE initiated OSD functionality at locations where you do not have a Windows Server OS, you should probably consider Serva on Windows 7/8 as a neat and affordable solution. |
5 PXE Booting PE based Symantec Ghost clients
Both the Console, and the Standard Tools include WinPE 2.0 based booting capabilities. The Ghost Boot Wizard allows you to select the PreOS version to use; just select WinPE and the created booting ISO will contain:
G:\SOURCES\BOOT.WIM
Just put BOOT.WIM under Serva control within its corresponding head directory as explained in 3 PXE Booting WindowsPE executives. Next just boot your PXE client.
6 PXE Multi-Repository Integration
The integration in one network segment of the PXE access to different solutions like WDS, MDT, SCCM, Ghost, Acronis, etc, can many times result complicated and time consuming.
Serva offers the simple alternative of a single PXE service able to target as many different solutions as you need, under the control of just only one automatically created access menu. i.e.

Fig 4: multi-Repository single-Menu Serva PXE/BINL integration
The Fig 4 depicts the WIM/Asset flow on a Serva PXE/BINL "multi-Repository" scenario.
- Initially we copy under Serva control (as explained in 3 PXE Booting WindowsPE executives) the different repositories's boot.wim files (actually depending on the repository they have different names like LiteTouchPE_x86.wim, WDS_Capture_WinPE_x32.wim, Boot.wim, etc.)
- Next when a PXE client boots-up it receives Serva's PXE offer displaying Serva's PXE/BINL menu including entries pointing to all the repositories.
- When the client makes its booting decision the corresponding Boot.wim is TFTP transferred from Serva repository and run at the client. It is this particular component the one that knows how to connect to its corresponding back-end repository and what to do with it.
- From this moment-on all the component transfers between the repository and the client are carried-out using a repository offered network share, while Serva's PXE/BINL services rest.
7 PXE Booting PE based recovery/test tools
Serva is able to PXE boot thousands of PE based recovery/test tools, the following are just a few examples for you to know how to get running your particular case.
7.1 Windows Defender Offline (WDO)
Download WDO downloader mssstool32.exe or mssstool64.exe from here. Run the corresponding downloader and save WDO as ISO file.
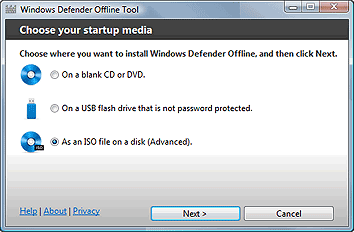
Fig 5: Downloading WDO as ISO file with mssstool32.exe/mssstool64.exe
7.1.1 WDO 32Bit
Extract from the downloaded WDO_Media32.iso
G:\sources\boot.wim
G:\mpam-fe.exe
G:\FilesList32.dll
Put boot.wim under Serva control within its corresponding head directory as explained in 3 PXE Booting WindowsPE executives.
Copy
mpam-fe.exe and FilesList32.dll under i.e.
C:\SERVA_REPO\WIA_WDS\<head_dir>\$OEM$\$Boot$\$1
Stop/re-start Serva.
7.1.2 WDO 64Bit
Extract from the downloaded WDO_Media64.iso
G:\sources\boot.wim
G:\mpam-fex64.exe
G:\FilesList64.dll
Put boot.wim under Serva control within its corresponding head directory as explained in 3 PXE Booting WindowsPE executives.
Copy
mpam-fex64.exe and FilesList64.dll under i.e.
C:\SERVA_REPO\WIA_WDS\<head_dir>\$OEM$\$Boot$\$1
Stop/re-start Serva.
| Note |
|---|
|
7.2 ESET SysRescue
From the created ISO extract:
G:\SOURCES\BOOT.WIM
Put BOOT.WIM under Serva control within its corresponding head directory as explained in 3 PXE Booting WindowsPE executives. Next just boot your PXE client.
7.3 Acronis Backup & Recovery CD
Use the generated Acronis.wim or from Acronis CD/ISO extract:
G:\sources\boot.WIM
Put Acronis.wim or boot.wim under Serva control within its corresponding head directory as explained in 3 PXE Booting WindowsPE executives. Next just boot your PXE client.
7.4 Active@ Boot Disk, Active@ Undelete, etc.
From the created ISO extract:
G:\SOURCES\BOOT.WIM
Put BOOT.WIM under Serva control within its corresponding head directory as explained in 3 PXE Booting WindowsPE executives. Next just boot your PXE client.
7.5 Paragon Advanced Recovery CD, etc.
From Paragon CD/ISO extract:
G:\SOURCES\BOOT.WIM
Put BOOT.WIM under Serva control within its corresponding head directory as explained in 3 PXE Booting WindowsPE executives. Next just boot your PXE client.
7.6 Microsot Server restore disks.
This has been tested on:
- Client Restore Disc: Windows Server 2012 Essentials (x86 and x64)
- Client Restore Disc: Windows Storage Server 2008 R2 Essentials (x86 and x64)
- Client Restore Disc: Windows Home Server 2011 (x86 and x64)
- Client Restore Disc: Windows Small Business Server 2011 Essentials (x86 and x64)
From the corresponding CD/ISO extract either:
G\SOURCES\BOOT.WIM or G\SOURCES\BOOT_x86.WIM
Put i.e. BOOT.WIM (64Bit) under Serva control within its corresponding head directory as explained in 3 PXE Booting WindowsPE executives.
Now copy the directory:
G:\785AD7EA-0C16-4F43-8AB5-F2904D22483F (2012 Essentials)
or
G:\1FAE75EB-B11A-4883-BCEE-9AC1C6D95216 (2008 R2 , Home Server 2011, SBS 2011)
to
C:\SERVA_REPO\WIA_WDS\<head_dir>\$OEM$\$Boot$\$1
Re-start Serva for injection
Boot your PXE client.
7.6.1 Server 2012 R2 Essentials
- Install the corresponding "Windows Assessment and Deployment Kit" (WAIK).
- Create a USB recovery key. In the Server Essentials dashboard, click on Devices/Computer Tasks/Client computer backup tasks, then click on the Tools tab and Create Key….
- Take the BOOT.WIM from the created key and follow the steps mentioned above.
| Note |
|---|
| Server 2012 R2 Essentials also offers the Client Restore Service but it requieres the set-up and maintenance of the WDS server service. If this method is used WDS must be correctly integrated with Serva (See 4). The USB recovery key method is simpler, and does not requiere WDS. |
7.7 Microsoft Diagnostics and Recovery Toolset (DaRT)
DaRT 10 is a part of the Microsoft Desktop Optimization Pack (MDOP). MDOP is part of Microsoft Software Assurance.
7.7.1 DaRT 64Bit
Extract from the created MS_DaRT_10_Eng_x86_x64.iso
G:\sources\bootx64.wim
Put bootx64.wim under Serva control within its corresponding head directory as explained in 3 PXE Booting WindowsPE executives. Next just boot your PXE client.
7.7.2 DaRT 32Bit
Extract from the created MS_DaRT_10_Eng_x86_x64.iso
G:\sources\bootx86.wim
Put bootx86.wim under Serva control within its corresponding head directory as explained in 3 PXE Booting WindowsPE executives. Next just boot your PXE client.
8 Troubleshooting
8.1 General WDS boot/install
Please see the WDS related topics from the troubleshooting section at Serva PXE/BINL - AN01: Windows Install.
8.2 Booting Windows PE Executives
8.2.1 Missing required files.
When Serva processes Windows PE assets you can see errors like:
[...] BINL Inf: Expandd OK, C:\SERVA_REPO\WIA_WDS\WinPE_x64\_SERVA_\pxeboot.n12
[...] BINL Err: Expanding C:\SERVA_REPO\WIA_WDS\WinPE_x64\_SERVA_\bootmgr.exe
In this case the file bootmgr.exe was not found next to the bootable WIM nor within the WIM either. The error mentions "Expanding" as the last process that failed when looking for bootmgr.exe before aborting any further process on the asset.
You can quickly solve this problem by adding next to the WIM a matched pair (same Windows PE version) of pxeboot.n12/bootmgr.exe files.
9 Final words
The discussed Serva PXE/BINL advanced techniques represent one more step in the road to master the different Microsoft Windows network boot/install scenarios. Advanced users can now perform unattended PXE installs and PXE multi-repository integrations with an easy-to-use application.
For those Serva PXE/BINL users also interested on network boot/install Linux distributions, Native Hypervisors, Recovery Tools, DOS/FreeDOS, etc, please read about all of these exiting features here:
Serva PXE/BINL - AN03: Non-Windows Network Boot/Install.
If you are a Serva Community user and you find it useful please consider purchasing Serva Pro. Non-personal or commercial use of Serva always requires a Serva Pro license (see Serva's download page for further details).
Serva bugs, comments, or ideas on how to improve the information contained in this document please contact us here.
| Updated | 01/29/2026 |
| Originally published | 02/01/2013 |